Intangible Final: Paint By Numbers

Intangible Interaction

  1. Your name

Dylan Dawkins

  1. Project title

Paint By Numbers

  1. A Summary of Your Project (1-2 sentences)

Paint by Numbers is a collaborative mural that gives children hospital patients a chance to show their creativity and family, friends, and strangers the opportunity to make that creativity a reality.  Patients are each assigned a small part of the mural to draw on. That drawing is passed on to someone who has access to the large scale mural,  and they fill out the corresponding section.

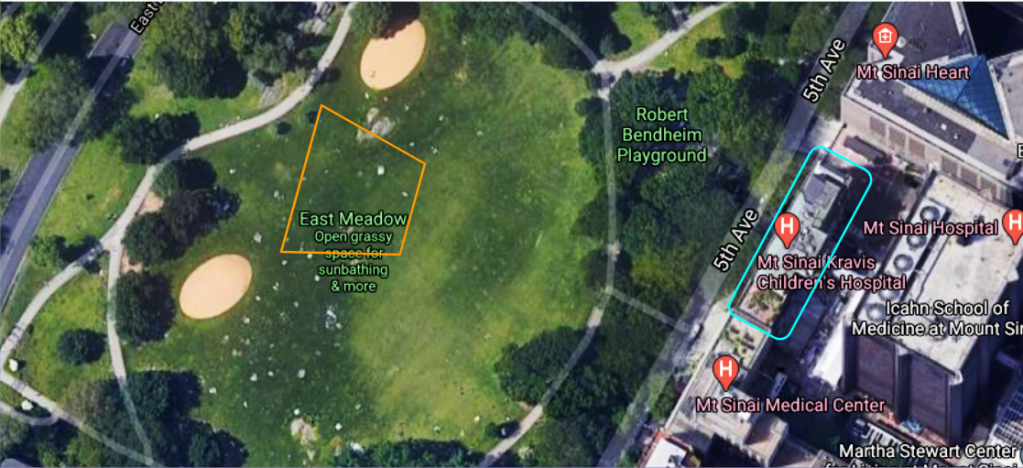
  1. Ideal Installation Venue
    The Installation venue would be located in Central Part in a large grassy area in East Meadow across from Kravis Children’s Hospital
  2. Background and Concept
    This project was inspired by the uptick in arts related pandemic pastimes.  Going to Walmart or Target and seeing all of the jigsaw puzzles cleaned out and seeing many posts of people painting and using coloring books, I was inspired to ask the question, what if this was something we could collectively do.  It was also inspired by the hospital experience.  For kids in long-term hospital care, sometimes going outside and doing creative activities is a challenge,  I wanted to give them an opportunity to make something that would make a beautiful mark outside of their hospital room.  Examples of similar projects before include Epcot’s Paint By Numbers activity during the Festival of the Arts.
  1. Project Description
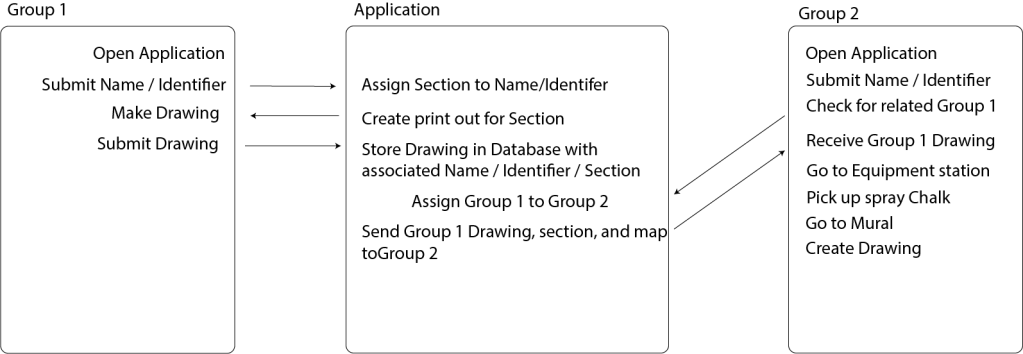
    This project is a paint by numbers on a gigantic scale.  The project is split up into three parts: the set up, participant group one, and participant group two.  The set up involves the creation of a mural outline both in digital format and on the Central Park grass, this will serve as a template from which participants in group one and group two can work.  Each section of the mural will be numbered and assigned to patients who are in the park-facing rooms at the hospital (or in long-term care rooms). These patients make up group one of the participants. They can use four colors – light red, light yellow, light blue, and white – to create their own drawing within the lines of the section.  This will be accomplished by either using their device to draw or by using a sheet of paper with a print out of their assigned section and some colored pencils.  Once these are saved, the project will move to participant group two. Participant group two can be either the family/friends/associates of a member of group one, or someone who signs up to take part in this project.  They will receive the drawing of the related group one participant if they are the former or a random drawing from group one if they are in the latter.  Depending on the colors used, participants from this group will be given a set of spray chalk and a time slot to go to the mural and paint out the drawing. In the end, The mural will be filled with chalk drawings by the different children in the hospital as interpreted by the friends/family or by the random stranger.  Paint by Numbers is a different approach to the idea of sensors and how sensors like cameras interpreting data.  Like a camera which converts light particles from 3D dimensional space into a grid of pixels in 2D space this project thinks about how people might act as sensors and reinterpret light and color and recreate it.
  1. Audience Interaction
    There are three levels of audience interaction.  The first two levels are described in the above description, the third would be the passersby in Central park would see the giant mural on the grass and wonder why it was there.  They would not interact with the mural itself but there would be a poster that is next to the mural that would explain its purpose and give them an opportunity to be a part of the second group.  Additional interactions include the children from group one being brought to the roof of the Hospital at the time slot their corresponding group two members are set to draw their piece of the mural.  They can see their time drawing come to life.  The app would also allow the group two members to share pictures of their drawing with the child from group one. 
  1. Social Impact
    There are a few different ways I want to impact people with this installation.  The first is that I want people to feel like they can add creativity to the world. Closely related to that, I want them to feel that by working together that creativity can become even larger.  For the child it is seeing their tiny painting become a bigger one made by their family or friends or someone they never met.  And also for the others it is seeing their bigger painting become a part of something even larger.   I want to instill a sense of community and the fact that with collaboration and connection we can build amazing things that have our own unique touch too.
  1. Sketch / 3D Drawing / Photo / Installation Plan
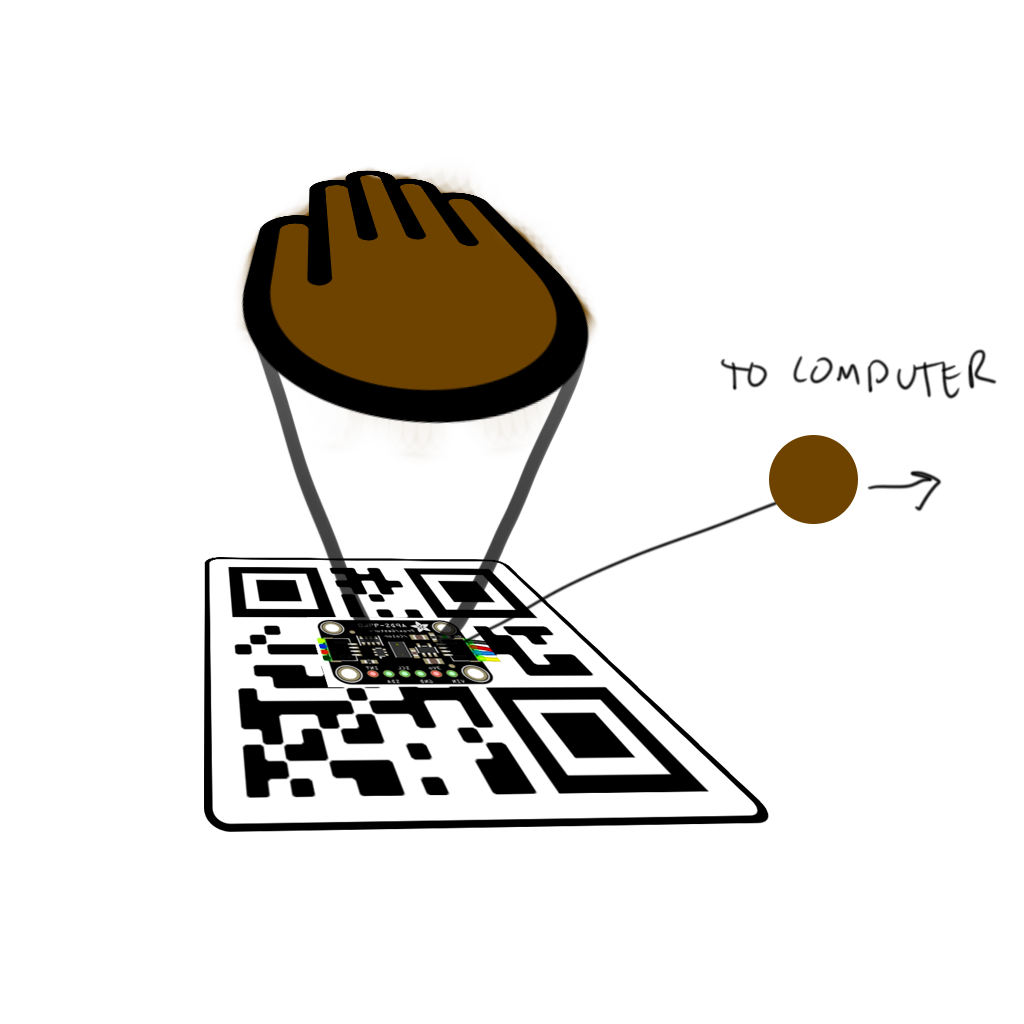
Representation of mural
location of Mural
View of mural space from Roof of Kravis
  1. System Diagram
  1. Prototype to Show the Proof of Concept
    LIVE DEMO
  1. Budget
Bill of Materials
Item nameDescriptionunit costquantitytotal costlink
Spray Chalk4 cans of 12oz spray chalk in four colors (white, pink, light blue, light yellow)$15.7940$631.60https://www.amazon.com/Testors-306006-Spray-Chalk-Color/dp/B07HGTQ8PW?th=1
Marking WandSingle wheel marking tool used to draw spray paint lines$24.001$24.00https://www.homedepot.com/p/Rust-Oleum-Professional-Marking-Wand-2393000/100111872?source=shoppingads&locale=en-US&mtc=Shopping-B-F_D24-G-D24-24_3_SPRAY_PAINT-Multi-NA-Feed-LIA-NA-NA-FY21_SprayPaint_LIA&cm_mmc=Shopping-B-F_D24-G-D24-24_3_SPRAY_PAINT-Multi-NA-Feed-LIA-NA-NA-FY21_SprayPaint_LIA-71700000075826946-58700006496586419-92700058691145262&gclid=EAIaIQobChMIxebGsLGU8AIVht7ICh2a5gyZEAQYBiABEgJfJPD_BwE&gclsrc=aw.ds
Athletic Field Striping Paint Spray, 17 oz, WhiteSpecial Water-Based Formula For Striping Athletic Fields$9.1910$91.90https://www.amazon.com/RUST-OLEUM-206043-Industrial-17-Ounce-Athletic/dp/B000BZX4Y8/ref=sr_1_2?dchild=1&keywords=Water-Base+Athletic+Field+Striping+Paint&qid=1619181862&sr=8-2
Spray DisenfectantAntimicrobial technology provides 24-hour sanitization against bacteria$38.231$38.23https://www.amazon.com/Microban-Professional-Sanitizing-Spray-Clear/dp/B086RLYB2H/ref=sr_1_8?crid=2VBG11NO1CZJE&dchild=1&keywords=spray+disinfectant&qid=1619182127&sprefix=spray+dis%2Caps%2C176&sr=8-8
Signage MaterialFull-color poster and stand to be erected near mural in Central park$29.992$59.98https://www.fedex.com/apps/printonline/#!productPicker/signsAndBanners
Misc. Costs$56.001$56.00
Total$901.71
  1. Additional Information

Presentation link: https://docs.google.com/presentation/d/1Jw6rVzdfkDsn7XraQncjXLZ26PSpGB0iBLgmFzAGHcA/edit?usp=sharing

Week 08: GET Requests

For this past week I wanted to reuse my mirror with pulling data from the ITP weather station. In order to do this I used the example code for using weather data with Arduino found here. Pulling the data was very simple, with the template only needing a few tweaks to start working on my own device.

Once I had the data, I knew I wanted to visualize temperature and humidity with the LED mirror I created from the previous assignment. I decided to use a color gradient to represent temperature, and height to represent humidity.

gradient for temperature
color range mapped to 0 – 41 deg celsius

The tricky part was remapping the linear LEDS into rectangular matrix. This was accomplished with this bit of code:

void initializePixelArray() {

  for (int row = 0; row < NUM_ROWS; row ++) {
    for (int col = 0; col < NUM_COLS; col ++) {

      // initialize all pixels to -1
      pixelArray[row][col] = -1;

      // top row assignment
      if (row == 0) {
        if (col != 0 || col != NUM_COLS - 1) {
          pixelArray[row][col] = topRow;
          topRow --;
        }
      }

      // left col assignment
      if (col == 0) {
        if (row != 0 || row != NUM_ROWS - 1) {
          pixelArray[row][col] = leftCol;
          leftCol ++;
      }

      // bottom row assignment
      if (row == NUM_ROWS - 1) {
        if (col != 0 || col != NUM_COLS - 1) {
          pixelArray[row][col] = bottomRow;
          bottomRow ++;
        }
      }

      // left col assignment
      if (col == NUM_COLS - 1) {
        if (row != 0 || row != NUM_ROWS - 1) {
          pixelArray[row][col] = rightCol;
          rightCol --;
        }
      }

      if (col != NUM_COLS - 1) {
        Serial.print(pixelArray[row][col]);
        Serial.print("   ");
      } else {
        Serial.println(pixelArray[row][col]);
      }
    }
  }
}

After creating that bit of code the rest just involved remapping the data and setting the pixel color.

void runLED(float temp, float humidity) {
  uint8_t start_r = 3;
  uint8_t start_g = 244;
  uint8_t start_b = 252;
  uint8_t end_r = 252;
  uint8_t end_g = 90;
  uint8_t end_b = 3;


  //calculate color based on temp
  uint8_t red = map(temp, 0, 41, start_r, end_r);
  uint8_t green = map(temp, 0, 41, start_g, end_g);
  uint8_t blue = map(temp, 0, 41, start_b, end_b);

  //calculate height based on humidity
  int pixel_h = map(humidity, 50, 150, 0, NUM_ROWS - 1);

  //print results
  Serial.print("Color: ");
  Serial.print("red: "); Serial.print(red);
  Serial.print(", green: "); Serial.print(green);
  Serial.print(", blue: "); Serial.println(blue);
  Serial.print("Pixel_h: "); Serial.println(pixel_h);

  pixels.clear();
  for (int row = NUM_ROWS - 1; row >= 0; row --) {
    for (int col = 0; col < NUM_COLS; col ++) {
      if (NUM_ROWS - 1 - row <= pixel_h && pixelArray[row][col] != -1) {
        if (pixelArray[row][col] % 2 == 0) {
          //assign color to every other pixel
          pixels.setPixelColor(pixelArray[row][col], red, blue, green, 50);
        }
      }
    }
  }

  pixels.show();

}

The LEDs are updated roughly every second and start from the earliest time in the database with increments every three hours. You can find the full code here.

Here is a demo:

Field-trip: AMNH

For this week’s assignment, I visited the American Museum of Natural History and to a look at their temporary exhibit The Nature of Color:

The Nature of Color poster

This exhibit was about color, obviously and the science and importance of color. It was an exhibit in which you had to pay extra for a limited opportunity to enter the exhibit. Because of the restriction on tickets, I did feel that the appropriate amount of people were able to experience it at once.

Poster on the various wavelength of light

I thought that despite the extent to which this exhibit was marketed in and around the museum, it might be a bit more engaging. Part of the reason for the lack of engagement. was the restrictions to interaction due to covid. Many of the touch based elements (and even some intangible sensor elements) were not in operation.

However, there was a couple intangible interaction based works as part of the exhibit that were still functional:

This work used a mounted azure kinect and a couple of projectors in combination with beautiful colorful dripping visuals to create an interactive projected experience.

Projector Kinect set up
Projector / kinect set-up

What I liked about this particular exhibit was that it wasn’t the usual body segmentation we see in Kinect type visuals, but it rather used the empty space and only had the body as an obstacle. This particular piece also cycled through a couple of different types of experiences. What was not working however, was the scaling/matching of the body segments to the digital positioning. If I was to do this differently, I might spend a little more time figuring out to match the positioning more and convey to the user a bit more explicitly what their movements are doing.

Cube-Project updates

  1. Arduino
    • I narrowed down a method for sending information to the server via Arduino using the Arduino nano 33 IOT and <WifiNINA.h> to make POST requests to a created server.
  2. Server
    • I spent a lot of time trying to build a server on heroku but came up against a lot of issues in connecting it correctly
const express = require("express");
const port = process.env.PORT || 8080;
const path = require("path");
const app = express();

const { MongoClient } = require("mongodb");

// mongo database info
const mdb_USER = <USER_NAME>;
const mdb_PASS = <PASSWORD>;
const mdb_URI = `mongodb+srv://${mdb_USER}:${mdb_PASS}@cluster0.j1urd.mongodb.net/test`;
let mdbClient;

// body parser
const bodyParser = require("body-parser");
app.use(bodyParser.json());

//  run webpack in dev mode
if(process.env.NODE_ENV === "development"){
    const webpack = require("webpack");
    const webpackDevMiddleware = require("webpack-dev-middleware");
    const config = require ('./webpack.dev.config.js');
    const compiler = webpack(config);

    // Tell express to use the webpack-dev-middleware and use the webpack.config.js
    // configuration file as a base.
    app.use(webpackDevMiddleware(compiler, {
        publicPath: config.output.publicPath,
    }));
}
app.use(express.static('public'));

app.get("/", function(req, res){
    res.sendFile(__dirname + '/app/index.html');
});

app.post("/api/data", (req, res) => {
    const body = req.body;
    const user = body.user;
    const message = body.message;
    if (!user || !message) {
        res.status(400).send("Missing user or message");
    } else {
        console.log({user, message});
        res.sendStatus(200);
    }
});

app.get("/api/database", async function(req,res){
    mdbClient = new MongoClient(mdb_URI,  {useUnifiedTopology: true });

    try{
        await mdbClient.connect();
        const collection = mdbClient.collection("pagemeta");
        const item = await collection.findOne({});
    } catch(err){
        res.status(500).send("Some error occurred.")
        console.log(err);
    }

    finally{
        await mdbClient.close();
    }
});

const listener = app.listen(port, function(){
    console.log('Your app is listening on port: ' + port);
});

However, after a lot of failure I might switch to an arduino-based server. I will try one more time to fix the server, but I am not super sure it will work…. but I AM HOPEFUL!

Server

  1. Unity
    • In Unity I am setting up Web requests to retrieve data from the server.

IEnumerator GetRequest(string uri)
{
   using (UnityWebRequest webRequest = UnityWebRequest.Get(uri))
   {
        // Request and wait for the desired page.
        yield return webRequest.SendWebRequest();        
        string[] pages = uri.Split('/');
        int page = pages.Length - 1;

        if (webRequest.isNetworkError)
        {
            Debug.Log(pages[page] + ": Error: " + webRequest.error);
        }
        else
        {
            Debug.Log(pages[page] + ":\nReceived: " + webRequest.downloadHandler.text);
        }
    }
}

In Blender I have started modeling my cube:

Intangible Interactions: Curious Cube

Curious Cube:

For the curious cube I wanted to focus on creating an interaction that was both digital and physical. My idea is simply to create a cube that you can customize and interact with physically but experience digitally.

  1. APDS-9960
    • This will be used both for gesture recognition (start up and wind down) as well as color (RGB) detection
  2. Arduino
    • The Arduino will relay color and gesture information to the computer via Serial
  3. p5.Serial
    • The p5.Serial application will be the interface in which the Arduino communicates with the computer and the web
  4. Heroku/server
    • Heroku / server will host the data on the internet so the app can read the information
  5. Unity
    • Unity is responsible for creating and animating the cube it will send GET requests to server to get info about color and gesture.

Minimum Interaction:

  1. User waves over gesture sensor -> Cube Spawns in AR
  2. AR UI prompts user to put hand (or object) over sensor -> Cube color changes the color detected
  3. Cube animates
  4. User waves over gesture sensor -> Cube disappears

Additional Interactions:

  1. User gestures to left -> cube switches to another cube model.
  2. User says hi -> cube responds
  3. User says can I touch your hair -> cube says no
  4. Users hand moves close to cube -> cube gets mad and disappears
  5. User says bye -> cube animates bye and disappears

Intangible Interactions: Week 03

Building off of part one, I decided to building an interactive mirror using the VL53L0X Time of Flight Sensor.

Initially, I wanted to create a vanity mirror that would turn on when a user stepped in front of it. It would be a simple interaction, but there were several parts for me to consider.

  1. Mirror
  2. Lighting
  3. Power Source
  4. Code
  1. The mirror:
Typical door mirror is about to get an upgraaaddde!!

I decided to use my bedroom mirror to permanently be the test subject of all my LED related mirror projects in the future, so good luck getting rid of it. What is nice about this mirror is that the border is flat which makes it particularly suited for mounting parts onto it.

2. Lighting


BTF-LIGHTING RGBW RGBNW Natural White SK6812 (Similar WS2812B) 16.4ft 5m 60leds/Pixels/m Individually Addressable Flexible 4 Color in 1 LED Dream Color LED

I ordered these addressable RGBW LEDs from amazon so they would be compatible with the Arduino code and also so I could use them for lighting projects in the future. I cut and soldered different lengths of LEDs to wrap around the mirror and attached them.

3. Power Source

Given all of these LEDs I knew I could not power them from my computer alone so I decide to invest in a bench power supply. I ordered a power supply from amazon (a lot of amazoning), and set it up to send 5V of power to the Arduino Nano IOT

4. Code

As far as programming the interaction, dealing with code was not *TOO* much of a challenge. Firstly, I wanted to create a delay between when the sensor picks up something in front of it and when the lights turn on. I wanted to do this so that just passing in front of the mirror would not turn it on immediately. The code that I used to solve that is as such:

void timerFunction(float data){ // "data" is the sensor value from the VL53L0X
  // if object is within measurement range start timer
  if(sensorValue > openDistance && sensorValue < maxDistance){
    if(!timerStarted){
      timerStarted = true;
      startTime = millis();
    } else {
      timer = millis() - startTime;
      if(timer > DELAY_TIME){
        runLED(data);
      }
    }
  } else {
    timerStarted = false;
    timer = 0;
    stopLED();
  }
}

Secondly, I wanted to utilize the time of flight functionality of the sensor. I wanted the lights to get brighter as the user approached the mirror. I observed people getting closer to mirror to assess details on their person, as you get closer, the brighter lights would help illuminate those details. in order to do that, I used the map() function:

int brightness = map(data, 200, 800, 255, 5); // maps sensor value to brightness

This worked great with small scale LEDs. however when I hooked it up to the power supply and ran it on the larger strip, I ran into a problem. When I would get close to the sensor and the LEDs would max out at 255, the lights began to turn orangish red towards the end of the strip. I looked into this and discovered that it was that the voltage strength would diminish over longer strips especially when there was a lot of power running through them. As a solution, I decided to not turn all the lights on at once and rather skip over every other light.

This was working as well as I could have expected, however LEDs could not dim to a very low setting… I tried to get that dimming to work for a while but soon gave up. On the other hand, I wanted to experiment with the color options available in the LED strip, so I set up distance to map to a hue value:

int hue = map(data, 200, 800, 65535, (65536 / 2)); //maps distance from RED to CYAN

This is the final prototype I ended up with:

Future Considerations:

I would love to create a functionality that switched between white light and color I would also like to switch out the ToF sensor with another sensor (maybe a webcam) that would track the user’s face and adjust the lights accordingly.

Intangible Interactions: Week 02

Due to not being able to go outside much to observe interactions, I have settled for taking notes on the objects, spaces and interaction that happen to be in my apartment.  In my room alone, the types of interactions are limited but existing.  All actions I wanted to observe were ones that had some sort of intended outcome; whether it is opening a window to let in fresh air or putting on a shirt. Implicit interactions and intangible interactions were limited to smart devices like my google home and other complex hardware like my iphone and computer.  While there is certainly a benefit from analyzing and researching the different sensors and software implemented in these devices and their interactions, I was more interested in the non-intangible interactions that occurred in my bedroom.  

Turning on lights has always been an interesting interactive experience.  Illuminating dark spaces or bringing darkness to lit spaces with simple switches has revolutionized how humans work and socialize when the sun is no longer in the sky.  As technology has progressed, we have found new ways to turn and adjust lights, whether it is with knobs, motion sensors, sounds (like clapping), or voice. As someone who owns a google home mini and has gotten accustomed to asking google to turn on and off lights, turning on and off lights has never been easier.  However, lights in a home environment are not limited to illuminating spaces.  We interact with lights to illuminate objects (flashlights), display screens (TV, monitors), give indicators (blinking lights for equipment notifications), and many more.  

The particular interaction that caught my attention, was that of humans and mirrors.  Up until the invention of the camera, reflections have been the only way humans have been able to see themselves in the physical world (outside of artistic interpretations). Interacting with a reflection is really interesting to me because movement restricts the interaction rather than facilitates it (though that changes as scale increases). Viewing a reflection also requires adequate lighting.  The invention of vanity mirrors is proof of that point. 

Image result for vanity mirror with lights
Vanity Mirror (not mine lol)

A mirror surrounded by lights so the individual can get the best possible view of themselves.  The vanity mirrors I have encountered do not function implicitly, but explicitly with a classic on and off switch.  Vanity mirrors also are mirrors that are meant to be used with a particular reflection: the face. I think there is a concept here for an intangible interaction project… but I will explore that in my next blog.